How to Test Your Local Website on a Real Phone
Table of Contents
When building a website locally, the first preview usually happens in the browser on the same computer. That is useful, but it does not answer a very practical question: what does the site feel like on a real phone?
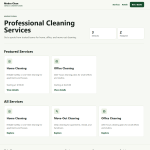
Screen recording from a real phone connected to the same local network. The video shows the locally developed website opening through the computer’s LAN IP address, confirming that the development server is reachable from an actual mobile device.
In native mobile development, this kind of workflow is expected. If you build iOS apps, you usually work with Xcode, simulators, and real device testing. If you build Android apps, Android Studio, emulators, and USB or wireless device debugging are part of the normal development loop.
Web development often starts more casually: open localhost, resize the browser, maybe use responsive mode in DevTools, and move on. That is convenient, but it can hide real mobile issues until late in the project. A better web workflow is to make real-device testing part of local development too.
This walkthrough is not only about Django. The method works for most local web development stacks: Django, Laravel, Rails, Express, Vite, Next.js, Flask, FastAPI, and many others.
The core idea is simple:
- Find the computer’s local network IP.
- Run the development server on
0.0.0.0, not only127.0.0.1. - Make sure the framework allows the LAN host if it has host validation.
- Open
http://COMPUTER_IP:PORT/from the phone.
In this article, Django is the tested example project, but the network method is framework-agnostic.
The final phone URL in this setup is:
http://192.168.1.113:8000/Your IP address will probably be different, but the method is the same.
1. Find the Computer’s Local Network IP
The phone cannot use 127.0.0.1 to reach the development server on your computer. On a phone, 127.0.0.1 means the phone itself.
So the first step is to find the computer’s LAN IP address.
On Windows PowerShell:
Get-NetIPAddress -AddressFamily IPv4 |
  Where-Object { $_.IPAddress -notlike '127.*' -and $_.IPAddress -notlike '169.254*' } |
  Select-Object InterfaceAlias, IPAddress, PrefixLength
In this project, the useful network interface was:
Ethernet 3 192.168.1.113 /24That means the phone should use:
http://192.168.1.113:8000/as long as the phone is on the same network.
2. Bind the Development Server to 0.0.0.0
Many development servers bind to 127.0.0.1 by default. That only accepts connections from the same computer.
For phone testing, the server must listen on all network interfaces:
0.0.0.0That is the key difference:
127.0.0.1:8000   computer only
0.0.0.0:8000     local network access possible
The exact command depends on the framework.
For the Django example project:
$env:DJANGO_ALLOWED_HOSTS="127.0.0.1,localhost,192.168.1.113"
python manage.py runserver 0.0.0.0:8000
For other stacks, the command looks different but the idea is the same:
# Vite / React / Vue / Svelte
npm run dev -- --host 0.0.0.0

# Next.js
next dev -H 0.0.0.0

# Express
app.listen(3000, "0.0.0.0")

# Laravel
php artisan serve --host=0.0.0.0 --port=8000

# Rails
bin/rails server -b 0.0.0.0

# Flask
flask run --host=0.0.0.0

# FastAPI
uvicorn main:app --host 0.0.0.0 --port 8000
Different tools, same network principle.
3. Handle Framework Host Validation
Some frameworks accept LAN requests as soon as the server binds to 0.0.0.0. Others add host validation.
Django is one of the stricter examples. It checks the incoming Host header. If the phone opens http://192.168.1.113:8000/, Django sees:
Host: 192.168.1.113:8000If that host is not allowed, Django can reject the request.
Instead of hardcoding a single IP into settings.py, the Django example project was updated to read allowed hosts from an environment variable:
import os
from pathlib import Path

ALLOWED_HOSTS = [
    host.strip()
    for host in os.environ.get("DJANGO_ALLOWED_HOSTS", "127.0.0.1,localhost").split(",")
    if host.strip()
]
This keeps the project flexible. Today the IP is 192.168.1.113; tomorrow it might be something else.
If you use another framework, look for the equivalent setting:
- allowed hosts
- trusted hosts
- host header validation
- dev server host allowlist
- CORS or origin settings, if the phone calls a separate API
The names differ, but the reason is the same: the framework may need to trust the host your phone uses.
4. Verify That the Server Is Listening
After starting the server, verify that it is not bound only to localhost.
On Windows:
Get-NetTCPConnection -LocalPort 8000The result should show:
LocalAddress    LocalPort    State
0.0.0.0         8000         Listen
In this project, the server was confirmed to be listening on:
0.0.0.0:8000That means LAN connections can reach the process, assuming the firewall allows them.
5. Test the Host Behavior
Because the example project is Django, the host behavior was tested directly.
The first test proves that a LAN host can render the homepage when it is allowed:
@override_settings(ALLOWED_HOSTS=["192.168.1.113"])
def test_lan_host_can_render_homepage_when_allowed(self):
    response = self.client.get(
        reverse("services:service_list"),
        HTTP_HOST="192.168.1.113:8000",
    )

    self.assertEqual(response.status_code, 200)
    self.assertContains(response, "Professional Cleaning Services")
The second test proves the opposite: the same host is rejected when it is not allowed.
@override_settings(ALLOWED_HOSTS=["127.0.0.1"])
def test_lan_host_is_rejected_when_not_allowed(self):
    response = self.client.get(
        reverse("services:service_list"),
        HTTP_HOST="192.168.1.113:8000",
    )

    self.assertEqual(response.status_code, 400)
This documents the exact security boundary in the Django example. The phone URL works only when the LAN host is explicitly allowed.
In another framework, you would test the equivalent behavior differently. For example, you might check that the dev server responds on the LAN URL, that the API accepts the origin, or that a host allowlist includes the LAN IP.
6. Run the Test Suite
After adding the LAN host tests, the full suite was run:
python manage.py testResult:
Found 13 test(s).
System check identified no issues (0 silenced).
.............
----------------------------------------------------------------------
Ran 13 tests in 0.834s

OK
The example project now has automated coverage for both the normal website behavior and the local-network access behavior.
7. Verify Localhost, LAN, and TCP Access
The local computer was checked first:
Invoke-WebRequest -UseBasicParsing http://127.0.0.1:8000/Result:
localhost status=200 contains=TrueThen the LAN IP was checked from the same computer:
Invoke-WebRequest -UseBasicParsing http://192.168.1.113:8000/Result:
lan status=200 contains=TrueFinally, the TCP port was checked:
Test-NetConnection -ComputerName 192.168.1.113 -Port 8000Result:
TcpTestSucceeded: TrueAt this point, the development server is listening on the right interface, the example framework allows the LAN host, and the port responds.
8. Open the Site on the Phone
On a phone connected to the same Wi-Fi or local network, open:
http://192.168.1.113:8000/If the page opens, you are looking at the same local website from a real mobile device.
If it does not open, check these things:
- The phone and computer are on the same network.
- The development server is running on
0.0.0.0, not only127.0.0.1. - The framework allows the computer’s LAN IP as a host if it has host validation.
- Windows Firewall allows inbound access to the process or port.
- The network is private/trusted, not an isolated guest Wi-Fi.
- If the frontend calls a separate API, that API must also be reachable from the phone.
9. Why This Matters
Browser responsive mode is helpful, but it is still an approximation. A real phone can reveal details that desktop browser tools might miss:
- Touch target sizing
- Real font rendering
- Mobile browser chrome
- Network latency
- Scrolling behavior
- Layout issues around sticky headers or forms
- Real device keyboard behavior
LAN access makes it possible to test the local site on a real device before deployment. That is a small setup change, but it improves feedback dramatically.
This brings web development closer to the testing discipline that mobile app development already expects. You do not need Xcode or Android Studio to test a website on a phone, but you do need a local device testing path. Opening the development server from your own phone gives you that path with very little overhead.
It is especially useful during active development:
- You can catch mobile spacing issues before a client sees them.
- You can test navigation, buttons, forms, and sticky headers with real touch input.
- You can see whether the design still feels good inside mobile browser chrome.
- You can verify that local API calls and frontend behavior work outside the desktop browser.
- You can take real screenshots for documentation, QA, or client updates.
The key is timing. Mobile testing should not be a final polish step. It should happen while the website is still being built.
10. What If the Client Is Not on the Same Network?
The LAN method has a clear limit: 192.168.1.113 is a private network address. It only works for devices connected to the same local network.
If a client is not on your Wi-Fi or local network, they cannot open:
http://192.168.1.113:8000/For a remote client, you need a public or shared access path. There are a few common options.
Option 1: Temporary Tunnel
For a quick demo, use a tunneling tool such as Ngrok, Cloudflare Tunnel, Tailscale Funnel, or LocalTunnel.
The idea is:
local port 8000 -> public HTTPS tunnel URL -> client browserExample:
ngrok http 8000The client receives a URL like:
https://example-subdomain.ngrok-free.appThis is usually the fastest way to show local work to a remote client. It is best for short demos, design reviews, and quick feedback sessions.
Use it carefully:
- Keep the tunnel open only while needed.
- Do not expose real secrets or production data.
- Prefer HTTPS tunnel URLs.
- Add basic authentication if the tool supports it.
Option 2: Private Network or VPN
If you want remote access without exposing the site publicly, use a private networking tool such as Tailscale, ZeroTier, or a traditional VPN.
The client joins a controlled private network and opens your development server through that private route.
This is more secure than a public tunnel, but it requires the client to install or configure something.
It works well when:
- the client is technical,
- access should be limited to approved people,
- the project should not be publicly reachable,
- you need repeated private reviews.
Option 3: Staging Deployment
For client approval, QA, and realistic testing, staging is usually the best professional option.
Instead of exposing your laptop, deploy the project to a staging environment:
Git repository -> staging server -> staging URL -> client reviewExample:
https://staging.example.comA staging environment is better when:
- the client needs repeated access,
- multiple people will review the site,
- the site needs realistic HTTPS/domain behavior,
- you want deployment logs,
- you need a stable URL,
- the review process may last days or weeks.
For this project, a managed platform with PostgreSQL and environment variables would be a good staging target.
Option 4: Router Port Forwarding
Technically, you can expose your computer directly by configuring router port forwarding.
That usually means:
public router IP -> forwarded port -> local computer -> dev serverFor client demos, this is usually the least attractive option.
Reasons to avoid it:
- home or office IPs may change,
- HTTPS is not automatic,
- firewall rules can be fragile,
- your computer must stay online,
- the development server is exposed more directly,
- it is easy to forget the port open.
Use a tunnel, private network, or staging deployment instead.
Decision Table
The rule of thumb is simple: use LAN access for your own devices, a tunnel for quick remote demos, and staging for serious client review.
Conclusion
To open a local website from a phone, three things must line up:
- The computer’s LAN IP must be known.
- The development server must listen on
0.0.0.0. - The framework must allow the LAN host if it validates hosts.
In this project, the working phone URL is:
http://192.168.1.113:8000/The setup was verified with framework tests, HTTP checks, and a TCP port check. Django was the tested example, but the method applies broadly to local web development.
For clients outside your network, the LAN URL is not enough. Use a temporary tunnel for quick demos, a private network for controlled access, or a staging deployment for professional client review.
Evidence
- Local network IP detected as 192.168.1.113
- Development server started on 0.0.0.0:8000
- The Django example project allowed 127.0.0.1, localhost, and 192.168.1.113
- Localhost request returned 200
- LAN IP request returned 200
- TCP test to 192.168.1.113:8000 succeeded
- Test suite passed: 13 tests
- Remote client access options documented conceptually: tunnel, VPN/private network, staging deploy, and production deploy